

Tool Use
Each tool profile (shape) is used to create the specific image desired in the mate-rial being carved. There are four basic types of shapes: gouges, V-tools, chisels and skews. These shapes also are referred to as profiles, or sweeps, depending on your region or country. There are other shapes available, however, they are variations of these same tools and are more specialized.
Gouges
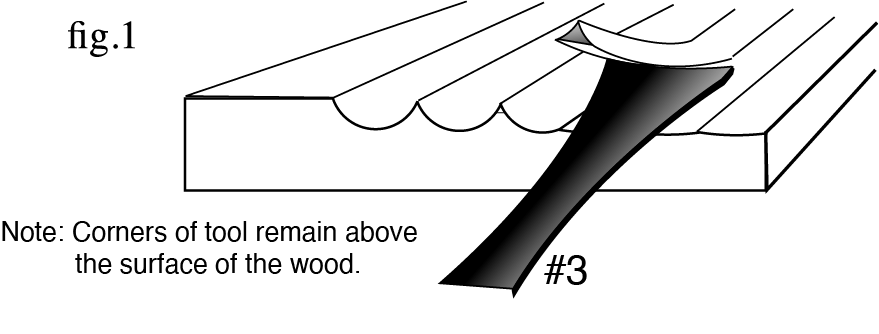
Gouges are the round-shaped tools. They are given a number to describe how deep a cut they make (the higher the number, the deeper the cut), and a width dimension to describe the width of the cutting edge. For example, a #3 X 1/2” is a very shallow almost flat cut and is 1/2” wide. A #11 X 1/8” is a deep U-shaped cut and is 1/8” wide. Gouges are used for modeling surfaces or creating different textures. The deeper shapes remove the most material and as a result, leave the roughest texture. The more shallow shapes do not remove much material. However, they leave a smoother surface. Hence, higher numbers are used for roughing out basic shapes quickly and the lower numbers are used to smooth the ridges left from using the deeper tools— that is, if a smooth surface is desired (see fig. 1). A rule of thumb for choosing the width of tool is “the larger the work, the wider the tool.” This will reduce the number of cuts and speed up the carving process. The smaller the tool, the more detail can be carved. When using any carving tool, it’s important to remember that neither of the outside corners of the cutting edge should go so deep as to go below the carving surface. This allows the edge to cut cleanly with less effort and not tear or split. Push the tool through the entire cut. Prying with the tool can damage the edge.

V-Tools
V-tools, as their name describes, are the angled, V-shaped tools. Available in different angles and widths, they are used for outlining shapes, lettering, cutting lines or adding textures. They are also referred to as parting tools in that they part one surface into two. Their sharp corners leave a clean line of demarcation between two adjacent surfaces, much the same as outlining with a pencil. One of the surfaces can then be carved without affecting the other.
Chisels and Skews
Chisels, or #1’s, are perfectly flat and square-ended. Although mostly seen as a carpenter’s tool, they are handy for carving lettering and smoothing off convex surfaces. The latter is true because the corners of the cutting edge do not come into contact with the surface, maintain- ing as flat a cut as possible (fig. 3). If used on a concave surface, the corners would dig in immediately and tear the grain. Skews or #2’s are flat, much the same as a chisel, with the exception of having an angled end instead of being squared. This angle serves two purposes: (1) to give the edge a slicing action in order to reduce the resistance of the cut similar to a guillotine, and (2) to allow the point to reach into narrow spaces or angled corners beyond the scope of a chisel.
Holding the tool
Flexcut tools are extremely sharp and care must be taken at all times when handling them. To avoid injury, the tool should always be held with two hands, both to the rear of the tool’s cutting edge, one hand on the handle itself and the other near the blade, actually guiding it.
Inserting and removing blades
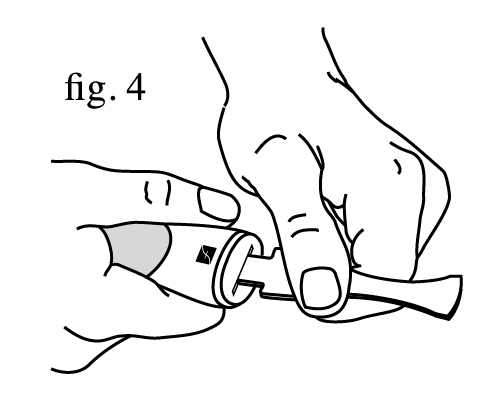
Always keep fingers and hands to the side of the blade clear of cutting edge when inserting or removing tools. (fig. 4) when inserting and removing a tool into and from the handle. Make sure the tool is fully seated into the handle. Never exert undue force on the blade when inserting it into, or removing it from, the handle. Avoid letting chips or other material lodge in the tool slot of the handle adapter. Such material can prevent the blade from fully seating in the handle. It can also cause the blade to jam in the handle. In either case extra care should be taken to correct the situation.

Keeping your tools sharp
Your Flexcut carving tools are presharpened at the factory to a highly polished razor’s edge. This creates an efficient, long-lasting cutting tool. The more polished the edge, the sharper it is and the longer it will stay sharp. Keeping your tools sharp requires some routine maintenance. This can most easily be done by periodically stropping both sides of the edge (outside and inside) with a Flexcut SlipStrop™ (available separately). A leather belt impregnated with polishing compound can be used as an alternative. Sharpening stones should not be used for this routine maintenance. They are too coarse and will put scratches in the polish, reducing the sharpness. The Flexcut Slipstrop™ designed with the inside profiles molded into it, so that stropping the inside edge can be done quickly. It can also be flipped over to accommodate the outside of the edge as well (see figs. 5 & 6). It is available from your authorized Flexcut dealer.
Stropping the outside edge
The bevel of the tool should be placed as flat against the strop as possible. The tool is then pulled away from the edge so as to avoid digging into the strop. Gouges should be rolled as they are pulled in order to polish the entire edge. Using the molded coves of the strop can reduce the amount of rolling and strokes needed because more of the edge is in contact with the strop. If the angle of the bevel against the strop is too high, it will round prematurely.
Stropping the inside edge
Find the strop profile that most closely fits the inside of your gouge or V-tool. The tool should be tilted up slightly as shown in fig. 7 and once again, pulled away from the edge. Tilting the tool while it is stropped creates a slight secondary bevel on the inside of the tool to give the edge more durability and remove any burr. Stropping frequency depends on how hard or abrasive the material is that’s being carved. When the tool begins to feel as if it’s dragging through a cut, the tool should be stropped a number of times until the sharpness is restored. Due to the cushioning effect of the wood or leather strop, each time the tool is stropped, the edge becomes slightly rounded. Eventually it will become so rounded that it no longer has an efficient cutting angle. To recognize this, check the angle at which the tool begins to cut in relationship to the surface of the work (fig. 7). When the angle is too high, the force being exerted on the tool is directed improperly. The force should be directed horizontally through the work and not vertically into it. If the angle is too vertical, the tool needs to be reshaped using a strop, to flatten the bevel back to its original angle. The edge should always be repolished to restore its sharpness and longevity.
Tool storage
Due to the extreme sharpness of the tools they should be stored in their carrying case and out of reach of children when not in use. Care should be taken not to store them in a humid environment (damp basements, greenhouses, etc.). The black oxide finish on the tools is a rust inhibitor but does not rust-proof them. For extra protection, a light coating of oil or paste wax can be wiped on the tool. Moisture desiccant packs placed in the carrying case can also be used. Allowing the edges to come into contact with each other, or other hard surfaces will damage them.